FAQ

Installation

The antivirus Windows Defender blocks Shape3d! What can I do?

26/06/2017

Some may have noticed a drastic slow down of the launch of Shape3d since a few days...
That's due to the latest update of Windows Defender!
You can exclude Shape3d from Windows Defender scan, that will correct the problem!

WinDefExclusion.png (697×904)

I receive a 'file is damaged' message when opening the application on a Mac! What can I do?

29/06/2017

You need to follow the following steps:

1. Open the System Preferences. There are two approaches:

- Click on the System Preferences icon in the Dock

- Selecting Apple Menu > System Preferences.

2. Next open the Security & Privacy pane by clicking Security & Privacy. (Make sure that the General tab is selected.)

3. Click the icon labeled "Click the lock to make changes" in the bottom-left corner.

4. Enter your username and password into the prompt that appears and click Unlock. (If you have no password, this can be left blank).

5. Under the section labeled "Allow applications downloaded from:", select the option "Anywhere". On the prompt that appears, click "Allow From Anywhere."

When opening Shape3d, you will get the message: 

"Shape3d is an application downloaded from the Internet. Are you sure you want to open it."

You can now run the application by selecting Open.

My Mac says: "macOS cannot verify that this app is free from malware" and won't let me install Shape3d!

02/07/2021
Shape3d does not contain malware, we guarantee it!
We're not a registered Mac developper company, but Shape3d is a trusted software for more than 20 years now,and we check that the installers we provide are malware free of course!

Here are 3 solutions so your Mac let you install Shape3d:

After updating Shape3d on my Mac it doesn't open anymore except the menu bar!

06/03/2024
On some Macs with Big Sur OS or older, after updating Shape3d it can happen that Shape3d can't open anymore and you get just the menu bar like that:


To correct this problem you need to access the Shape3D64 folder in the Library. You'll find the Library folder in the menu Go of the Finder. But by default it is hidden:


So you need to press the Option key (Alt on older Macs) to make the Library folder appear:


In the Library folder you'll find the Shape3D64 folder:


You need to delete it and then reinstall Shape3d from the installer you'll find at:

Note that you'll need to reactivate your license in the license manager of Shape3d after that.

I can't find your files in the Shape3d File Selector or the file browser, on my Mac!

17/05/2024

If your Mac doesn't allow you to install Shape3d then you need to check the "Privacy & Security" parameters in the "System Settings...":

In the panel "Allow applications downloaded from" you need to tick "App Store and identified developers":

If you can't find your files in the Shape3d File Selector or the file browser, then you also need to verify the parameters in "Privacy & Security"/"Files and Folders":

Shape3d X must have access to all your folders:

If you're experiencing repeated crashes of Shape3d you should also look at the "App Management" parameters and allow Shape3d X to update or delete other applications:

For any other problem with the installation of Shape3d X on your Mac check the FAQ: www.shape3d.com/FAQ.aspx

I can't open the s3dx files from the finder of my Mac anymore.

24/09/2024
If the installation of Shape3d on your Mac went well, then it should use Shape3d File Association to open the .s3dx files. If this doesn't work anymore, you'll need to go find the Shape3d File Association application and set it as the default application for .s3dx files.
You'll find it in the Shape3d X application package: go to the Applications folder, right-click on Shape3d X and select Show package content

Then look in the Content folder:

You should see the Shape3d File Association application:

Grab it and move it to the Application folder:

Then right-click on a .s3dx file in the Finder and click on Open with / Other...:

Select Shape3d File Association and check the box Always Open With:

You should be good then!

After installing Shape3d on Windows 10 I get an error message saying that the VCRUNTIME140.dll was not found. What should I do?

30/09/2024
You can download the missing package for Windows at https://www.microsoft.com/en-us/download/details.aspx?id=48145

I am using the Shape3D X on a new computer running Windows 11. The program crashes every time I try to generate the 3D view.

22/11/2024
The problem must come from the graphic card. You probably have 2 graphic cards on your computer and it's not using the best one with Shape3d. In this case it can be solved selecting the best graphic card for Shape3d:

License

How do I unlock Shape3D on my computer ?

15/06/2017
If Shape3d has never been used on the computer, the first time you launch Shape3d you'll get the following window:


If Shape3d has already been used on the computer, but without any license, or with a license that expired, Then, on your new compute, install Shape3d and, go to the menu License of Shape3d, and click Register Online:


- If you have access to the Internet, you can register a new license, or upgrade your license choosing the menu Register Online :

Enter your email, as registered on our website, and the license reference you received in the confirmation email of your order. Click "Register" and Shape3d will get your license information from our website.

Note that several licenses can be registered, and the options will sum up during their validity period.

- If you don't have access to the Internet and you want to register a new license or upgrade your license, choose Register Offline :

A window will pop up with the "Fingerprint" of your computer. Send this fingerprint together with your license reference to contact@shape3d.com, and we'll return you the "User name" and the "Registration key" that will unlock the options you chose in your license.

After you have entered the the user name and the key once, Shape3d will fully work on your computer.

How do I transfer Shape3d to a new computer?

15/06/2017
If you want to tranfert Shape3d to a new computer you'll have to uninstall Shape3d from your actual computer first. For that, go to the menu ? of Shape3d, and click Unregister Key:


Shape3d will ask you to confirm that you want to unregister the activation key. Unregister the activation key means remove the registration key from your computer and change the fingerprint.


If you’re connected to the Internet, this will also remove this fingerprint from our database, so you can install Shape3d on another computer straight away. You’ll see this confirmation window then:


If you’re not connected to the Internet, you’ll see this window that contains a Confirmation Code. Send us this confirmation code at contact@shape3d.com so we’ll know that you no longer use Shape3d on this computer and that you can install Shape3d on another one.

Then, on your new computer, if Shape3d has never been used on the computer, the first time you launch Shape3d you'll get the following window:


If Shape3d has already been used on the computer, but without any license, or with a license that expired, Then, on your new compute, install Shape3d and, go to the menu ? of Shape3d, and click Register Online:


If you are connected to the Internet, enter your Email and your License Reference. Then click on the Register button. It will connect to our server to unlock Shape3d on your computer.


If you don't have access to the Internet, click Register offline to get the following window:


Select and copy the Fingerprint of your PC in the clipboard.
Then, using the e-mail address you gave at the registration, send this Fingerprint,
as well as your User Name, to us at contact@shape3d.com.
We will send you back the unlock code as soon as possible.
After you have entered the the user name and the key once, Shape3d will fully work on your computer.

Which license do I need if I want to design my boards and send the files to a factory to have a pre-shape cut?

24/06/2017
If the factory is using Shape3d to run their CNC machine, you just need a Design Pro, or a Design, or even the Lite version (it depends if you want to set the fin plugs, or design channels...).
On the other hand, if the factory doesn't have Shape3d but uses a general CAM software like Catia or Solidwork to run their machine, youl'' need the 3D Export option to export your designs in the IGES, STL or DXF formats.

Which license do I need to run the CNC machine in my factory?

24/06/2017

You can get the Design Pro – CNC license for one computer at 810 € per year, or 2690 € for lifetime.

We also have a Factory package (2 computers with Design Pro – CNC, and a third with Design Pro only) for 1200 € per year, or 3900 € for lifetime.


Shape3d has reverted to the Lite version, even though my license is still valid! What should I do?

24/06/2017
The license can be unregistered on your computer because the date has changed, or a hard drive has been added.
In this case go to your account page on our website 
and unregister the old fingerprint of your computer.
Then you can redo the online registration in the menu License -> Register online of Shape3d.

If I buy a Design license, can I upgrade to a Design Pro license later later?

25/06/2017
Yes, you can purchase options separately at https://www.shape3d.com/Order/OrderOptions.aspx.
Then in Shape3d you can register several license references and the options will be added to each other.

What is a Perpetual license?

26/03/2024
Perpetual license means that you pay for the license upfront, and you have the right to use the software indefinitely on your computer.
The support and the updates are included for one year. 
After one year, you can subscribe to the annual Maintenance to keep getting all the updates and the support. 
It is not mandatory of course, you can keep using the same version you installed the first time if you're happy with it!

The license cannot be used on more than a given number of computers at the same time. If the license is for one computer only, it cannot be used on two computers at the same time. But the license can be easily transfered from one computer to another, provided Shape3d has access to the Internet.

What is a Monthly (or Yearly) license?

26/03/2024
Monthly (and Yearly) subscriptions will allow you to use the software for one month (or one month). The support and updates are included.
If the automatic renewal option is chosen, the monthly (or yearly) fee will be automatically charged at the end of the period, and the license renewed, with the same rights to the support and updates.

The license cannot be used on more than a given number of computers at the same time. If the license is for one computer only, it cannot be used on two computers at the same time. But the license can be easily transfered from one computer to another, provided Shape3d has access to the Internet.

How can I stop my automatic renewal subscription?

26/03/2024
The automatic renewal subscription can be stopped at any time from your user area on our website: https://www.shape3d.com/My%20Account/MyAccountMyOrders.aspx
by clicking on the button "Stop Auto-renewal".

On how many computers can I use Shape3d?

26/03/2024
You subscribe to a license for a given number of computers. It means that this license cannot be used on more than a given number of computers at the same time. 
If the license is for one computer only, it cannot be used on two computers at the same time. But the license can be easily transferred from one computer to another, provided Shape3d has access to the Internet.

Can I use my license on another computer if my computers is broken?

26/03/2024
Your license can be easily transferred from one computer to another, provided Shape3d has access to the Internet.
If you couldn't unregister your license from your old computer you can still do it from your new computer provided the old computer hasn't been used for the past 2 hours.
You can also unregister your old computer from our website at https://www.shape3d.com/My%20Account/MyAccountMyOrders.aspx

How do I change the method of payment?

13/07/2024
You need to stop your subscription at https://www.shape3d.com/My%20Account/MyAccountMyOrders.aspx and then get a new one at the renewal date with your new payment method.

The Design Mode

How do I open a .s3dx file with Shape3d V8?

20/06/2017
With Shape3d X you can save the files in the VX format (.s3dx) or V8 format (.s3d). But if you save it as .s3d you'll loose the 3D layers and multi-curves edition.

How to use the Shape3d File Browser on a Mac

07/10/2020
For the Mac users the Shape3d File Browser can be a little confusing!

The fact is that Shape3d is a PC application that uses the Wine environment to run on a Mac. Wine recreates a Windows shell for Shape3d, so the folders you see when you open the File Browser the first time in Shape3d is not the regular Mac Finder but a PC like finder that shows folders you've never seen:


The big buttons "Desktop", "My Documents" and "Workplace" on the left hand side won't help you much as they all lead to the base folder "Workplace" that contains several drives that won't be familiar to you:


The only thing you need to know here is that you'll find your regular folders (Desktop, Download...) following the path:Z:/Users/Your name/To get there click on "Workplace", then click on "(Z:)" , then click on "Users", then click on the folder that has your name, and you'll see the list of folders you're used to: Desktop, Download...


Now you can find you files, open them, save new files... Note that the green upward arrow allows you to move to the parent folder.
The good thing is that next time you'll open the File Browser it will open in the same folder, so you won't have to go through all these folders from Z: each time.
If you want the File Browser to open always in the same folder instead of the last one you've visited, you can set the "Models directory" in the Preferences that you can open from the Files menu:


Be careful then to set the "Models directory" correctly because if it's directing to a folder that doesn't exist then the File Browser will open initial Shape3d exe directory all the time, which is  
Z:\Application\Shape3d X.app\Contents\Resources\Shape3DX\.

How to measure the "rake": the angle between the deck and the bottom

01/08/2023
If you want to measure the angle between the deck and the bottom at the position of a fin box for exemple, you need first to get the angle that the fin box does with the horizontal axis.

You'll find this angle in the fin box properties: Tilt/Oy bellow the check box Auto-surface positioning (-0.61° here):

Then, to get the angle of the deck, you can insert a control point on the deck curve 
(Stringer deck, or the side curve of a 3D layer if you're using a 3D layer to design a recessed deck for exemple) 
at the same X position as the fin box:

You can see the angle of the curve pressing the ° button in the properties window of the control point (-0.54° here):

So here for exemple the angle difference is 0.61 - 0.54 = 0.07°.

How do I change the concave without changing the rail?

21/06/2017
If you want to encrease the concave at the center, you have several possibilities:
- Keep the bottom stringer edited, and move the rail point down on the slice.
- Edit the rail line in addition to the bottom stringer, and move the bottom stringer up.
- Edit the rail line, then un-edit the bottom stringer line. Then move the bottom stringer point up on the slice.
- Edit the profile (this will un-edit the stringer). Then move the bottom stringer point up on the slice.

Are there design mistakes I should avoid?

23/06/2017

* Width and Thickness


A Shape3d model must always have a strictly positive width and thickness, in particular at the tail and nose!

-       It means that the tail and nose of the outline must be “squared” rather than “pined”.


-       In the same way, the stringer must begin and end with a positive thickness.


A tail and nose with a positive width and thickness will allow you to avoid mistakes due to the fact that you can’t see the slices defined at the very tail and nose.


* Exceeding the Board Length


All the design curves must lie between x = 0 and x = length. Any loop would be misinterpreted by the software.


* Smoothness and Continuity


Check the smoothness of the curves.

- A general rule would be: the less control points the smoother.

- Prefer continuous tangents  to angular tangents . The curves must not do any loop.

- Avoid zero length tangents because it could do a very small loop around the control point.

- Check that you didn’t insert two control points at the same place

You can use the E key shortcut that will show the superposed control points in green, kinks and loops in red.

* Slices


- Here again, the less slices the smoother. The right number obviously depends on the shape…

If you design a new model, a good way to get a smooth shape is to begin with the design of the center slice, and then make all the other slices from this one. For that you can use the copy-past facility: select a slice on the outline view, click on the copy button  in the toolbar, select another slice and press the past button . Modify these slices to make the shape smoothly evolve from the tail to the nose.

- The design of a slice usually needs 4 to 5 control points.


It is safe to define the apex point (green , with vertical tangents ), the rail point (blue , with angular tangents ), and possibly another point on the deck to have a better control of the rail shape. The deck center point generally has a horizontal tangent . Same for the bottom center point except in case of V or inverted-V.

- It is important to check that two slices are not placed at the same x position. For that you can use the list of slices that appears when you are designing a slice. This list shows each slice with its x position.

* Apex and Rail Definition


- Concerning the apex point definition, you have two choices: either you fix a point at the widest position that you set as the Apex point, or you don't define an apex point.

Note that defining the Apex point assures that the separation between the deck and the bottom cut in the CNC mode will be clean. In particular, if the edges of some slices are vertical, the detection of the widest point can either give the top or the bottom of the vertical section, and end up with a waterline that jumps from the top to the bottom of the vertical section.


If you define the Apex point, make sure it is the widest point on each slice, or it will give inconsistent toolpaths in the CNC mode.

- It is also important to define the Rail point, as it will assure a clean cut of the tuck of the rail. It will also allow you to define the number of paths you want between the stringer and the rail, and between the rail and the apex.

Is it possible to open IGES, STEP or 3DM files with Shape3d X?

22/06/2017
Shape3d can open some IGES files, provided it contains NURBS surfaces with a simple structure, and no trimmed areas… There can be some distortions if the structure is too far from the way we design the boards in Shape3d.

How do I display the curvature?

27/06/2017

In the "Display" menu you can check the option "Curvature always". Then, the curvature will be displayed when you select a curve.

You can also choose to display the curvature just for one curve:


In the Top view, the list of curves contains all the curves corresponding to the points of the slices except the bottom stringer and deck stringer, plus the Outline curve (widest point of the slices, in case the Apex is not defined), and the Developed Outline (outline developed along the bottom stringer line).
In the Side view, the list of curves contains all the curves corresponding to the points of the slices, plus the Bottom and Deck Profiles (lowest and highest points of the slices), and the True Apex (height of the widest point of the slices, in case the Apex is not defined, or not correctly defined).

To display the properties of a curve, click on >> or double-click on its line.

Each curve can be displayed or not in a different color. The Curvature, Curvature Radius, and Directional Curvature Radius (same as SurfCAD) can also be displayed in other colors.

It it possible to create channels with 3D layers that goes out of the outline...?

21/06/2017
Yes with version 9.0.9.8 and later, if you check the option "Map on extended bottom" of the 3D layer.
After update 9.1.2.0 the option is called "Map on extended rail" and work for both bottom and deck rail.

The option "Map on extended railallows mapping the layer's slices on a straight line extrapolated from the rail point. Note that since version 9.1.2.0 you can define a rail point on the bottom of the slices, but also on the deck.


The "Full Scale" button 1:1 isn't giving me the real dimensions. What can I do?

27/06/2017
On some screens, you'll need to apply a correction factor in the menu Files -> Preferences:

The "Full scale correction factors" allow modifying the size of the board on the screen or on prints if the Full scale mode gives the wrong size. In full scale mode, the rendered size can be too small or too big depending on your screen or printer settings. If too big, set the factor smaller than 1. Set the factor larger than one if too small.
For exemple if the displayed width is 21 instead of 20, the factor is 20/21 = 0.95.
If the displayed width is 20 instead of 21, the factor is 21/20 = 1.05.

The files is on my Mac but I can’t open it! It says "The file doesn't exist".

22/06/2017
That is certainly because the file name or folder name contains forbidden characters, like ' or " or /. Try removing them. You can also try placing the file in another folder.

Sometimes in the thickness view i don't have the control points to edit the curve. What is the configuration of the curves so I can edit the thickness of the board?

30/06/2017

The control points appear in the thickness view only if the thickness show is computed between two curves fixed to each other:

The Edited curves can be set Fixed to another edited curve . This means that the relative distance between the two curves will stay constant when the second curve is modified. For example one can set the Deck Stringer line Fixed to the Bottom Stringer line, so that the stringer thickness doesn’t change when the Bottom Stringer line is modified. This thickness can be displayed in the Thickness View.

If rail and stringer are both edited, you can choose to lock the rail line to the stringer line so that the depth of the concave or V doesn’t change when you modify the stringer line. Then you can display the depth of the concave or V in the thickness panel and stretch it vertically to have a better view of the details…

In the Thickness View, if the curve displayed corresponds to the thickness between a curve that is fixed to another one and this other curve, the control points appear and the curve can be modified. In this view the curvatures can be displayed, and the colors changed. Also the curve can be stretched vertically if it’s too flat to be seen correctly.

How do I design a board from scratch?

22/06/2017

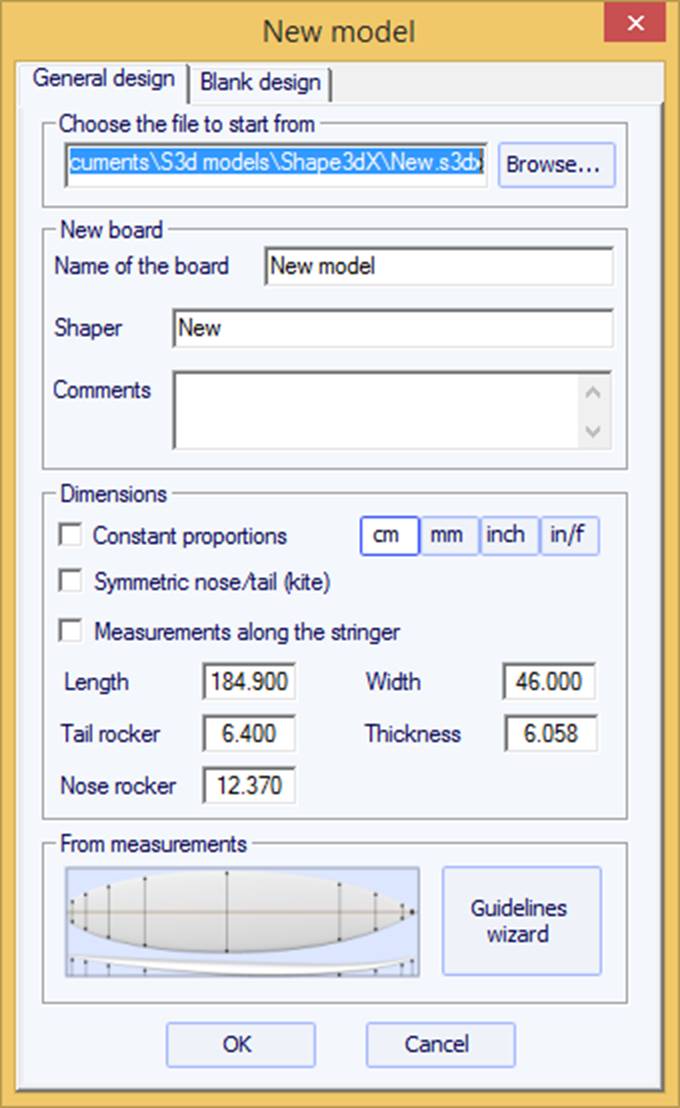
Go to the menu "File", then "New", or press the button “New”  . The following window pops up.

- Choose the model to start from between the examples proposed in C:\Shape3dmodels.

- Enter the name of the model you are going to design, and your name as a shaper. Add any comments you want.

- Choose the dimensions’ unit: centimeters, millimeters, inches or fractional inches.

- Check the box “symmetric nose/tail” for a twin-tip board.

- Input length, width, thickness, and tail/nose rocker.

- Check the box “Stringer measurement” if these dimensions are measured along the stringer. Uncheck it if they are measured along a straight line.

- Press OK.

The starting model appears in the Design mode.
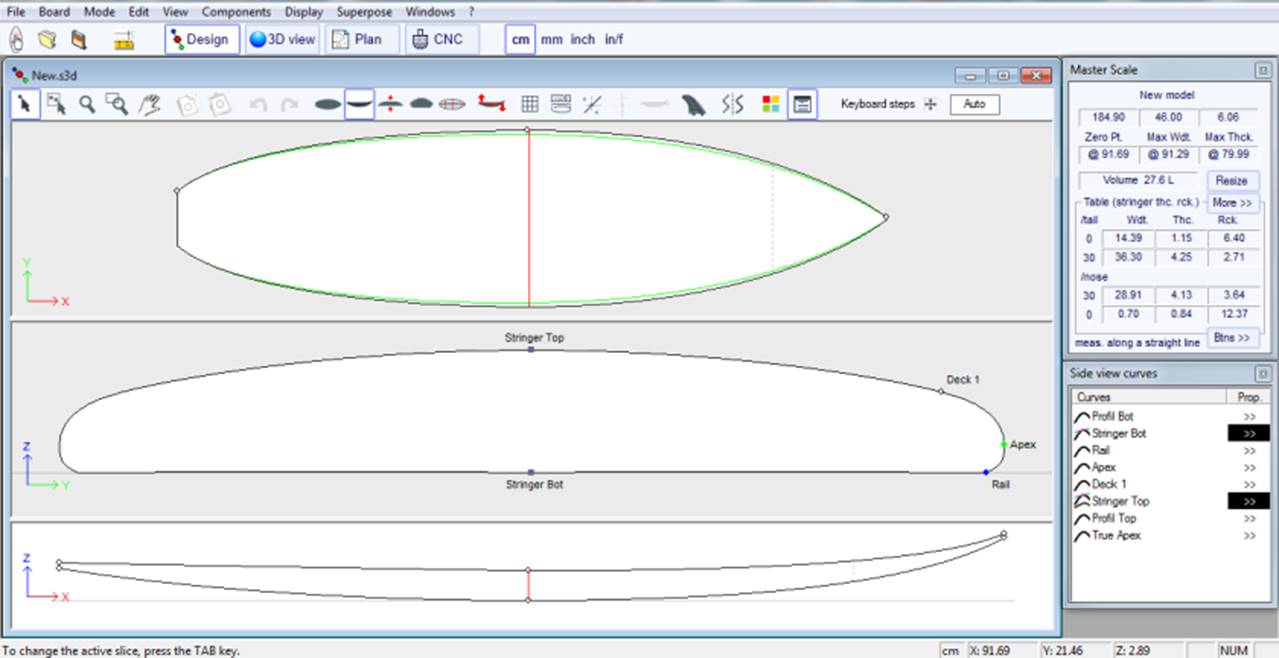
You can visualize three components of the board at the same time, choosing between Outline, Profile, Thickness, or Slices in the toolbar.

The dimensions of the board appear in the Master Scale box.

To modify the design of the curves, left click on the control points. The selected control point becomes red.
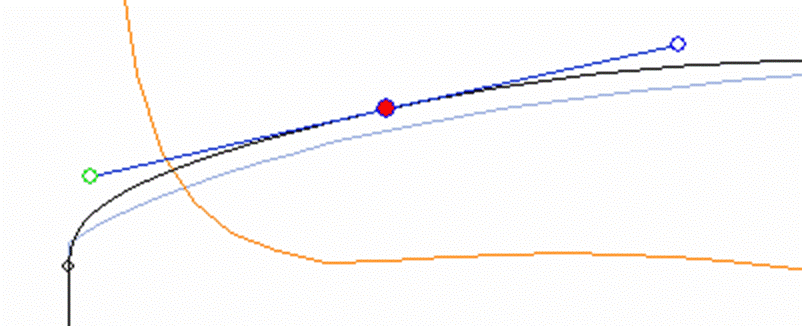
You can move the control points with the mouse, or with the arrows of the keyboard.

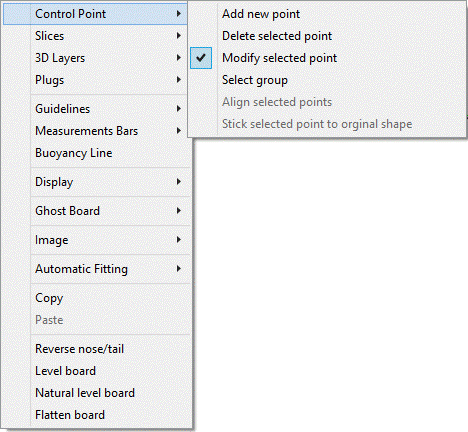
You can delete a control point pressing the button “Suppr” of the keyboard, or with a right click, selecting “Control point”, “Delete”.

You can also add a control point with a double left click at the position you want, or with a right click, selecting “Control point”, “Add new point”.
The properties of the selected control point are shown in the “Control point properties” box.
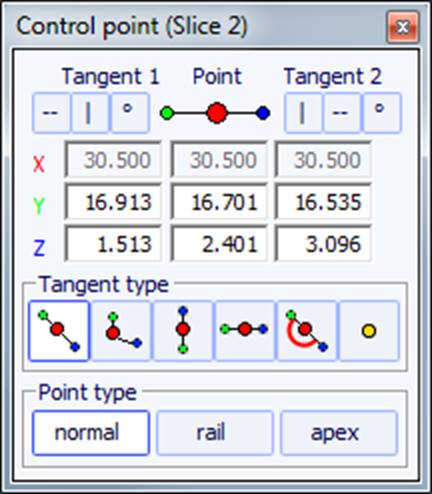
Five kind of tangents exist: continuous tangents , angular tangents , vertical tangents , horizontal tangents , and continuous tangents with fixed angle .

Continuous tangents are usually used. The angular tangents are more appropriate for the rail point of the slices, the vertical tangents for the apex of the slices, and the horizontal ones for the widest point of the outline, the zero point of the bottom, or the highest point of the thickness.

When designing the slices, it is recommended to set the point type of the rail point as  , and the apex point as . They will then appear in blue and green respectively.

All the slices must have the same number of control points.

The position of the slices can be modified with a right click, selecting “Slices”, “Move slice”. It can also be changed with the mouse in the outline view.
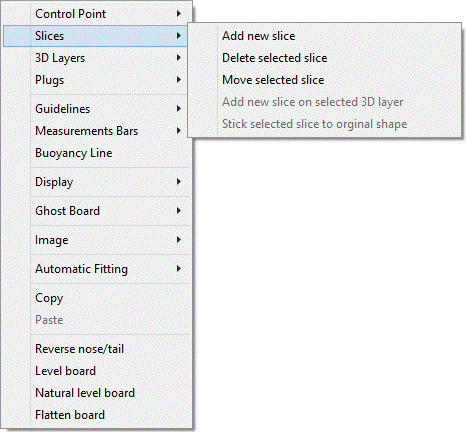
You can add or delete a slice, in the same way.

You can visualize the “flow” of the slices maintaining a left click in the outline, profile or thickness view. The width, rocker or thickness appear at the same time, as well as the distance from the tail and from the nose.
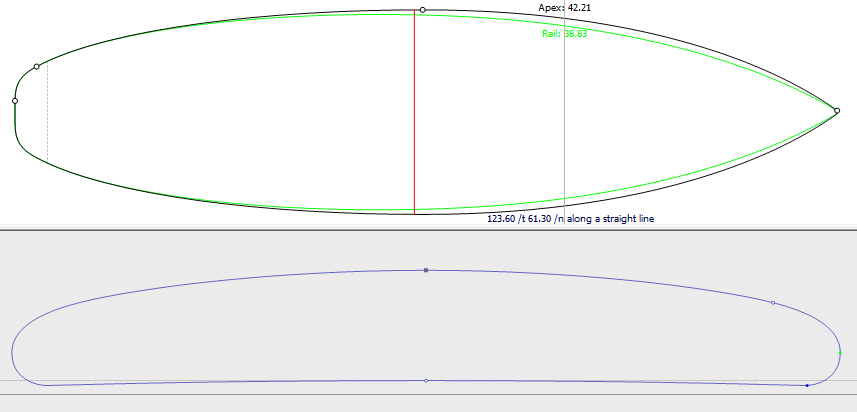
To understand the idea behind the design of a board with shape3d, just think about the rule of thumb: the less points the smoothest. Similarly, the less slices the smoothest.

Visualize the result of your art in the 3D View mode.

What is the difference between "Constant proportions" and "Constant rocker proportions" when you resize a board?

23/10/2017
"Constant proportions" will resize the width, thickness and the tail and nose rockers proportionally to the length, to keep the shape unchanged.
"Constant rocker proportions" will only change the tail and nose rockers proportionally to the length but not the width and thickness.

How do I design a board from measurements?

23/06/2017

As if you would design a board from scratch, go to the menu « File », then « New », or press the button “New”  , and fill in the name and size areas.

Then press the button “Guidelines wizard”.  The measurement wizard window pops up. You can choose to measure the dimensions of the board along the stringer:

or along a straight line, checking the box “Straight line measurements”:

Click on the button more if you want to place the guidelines at other positions than the default ones:

The positions of the guidelines along the length direction depend on the chosen unit: in centimeters, the guidelines are located at 5, 10, 20, 30 cm… from the tail and the nose. In inches, the guidelines are located at 1”, 3”, 6”, 12”… from the tail and the nose.

You don’t need to fill in each position box.

The outline and the profile will be automatically adjusted on the guidelines if you check the box “Automatic fitting”. Note that the Automatic Fitting is not always good enough!

Press “OK” to see the board in the Design mode.

The guidelines appear as green crosses. Their list, with the positions, appears on the right hand side of the bottom of the screen.

You can change their position with the mouse, or the keyboard, or with a right click in the “Guidelines” box, which will make the following window appear.

After changing the position of the guidelines, you can automatically fit the curves on the guidelines doing a right click on the selected curve.

If you click on a curve section between two control points, you have the possibility to adjust only this selected part of the curve, choosing “Fit selected curve to the guidelines”.

Then you have to choose if you want to adjust the length or the direction of each tangent, or both. And press OK.

You can also choose to adjust the whole curve, clicking on “Fit the whole curve to the guidelines”.

In this case you can choose the number of arcs (i.e. number of control points minus one) that will compose the whole curve. “Auto” will set it automatically, depending on the shape of the curve.

Once the design of the outline and profile is done, design the slices as explained in the chapter “Design a board from scratch”.

Why does the concave depth stay unchanged when I resize the thickness of the board?

08/11/2017
If the Rail point is defined on the slices, the thickness resizing only affect the deck and the rail of the board.
If you want to resize the concave or V depth homothetically with the thickness, you jet have the define the Rail point as Normal.

How do I design a blank?

23/06/2017

Go to the menu "File", then "New", or press the button “New”, and choose the tab “Blank design”.

Set the rough measurements of the blank and press “OK”. The blank will be automatically designed with square rails.

The smoothness of the curves is not guaranteed. You can modify the shape of the blank as shown in the chapter “Design a board from scratch”.

How to copy a curve or a slice from a board file to another?

08/11/2017
You can open both board files in Shape3d at the same time, and copy-paste the curve or slice from one board to the other.

How do I resize a board?

23/06/2017

In the main toolbar, click on the  “Size & Parameters” button:

Or on the "Resize" button of the Master scale window:


The “Name and size” tab displays the same features as the window “New”, plus the possibility the increase or lower the rails thickness (change the rail thickness the 50% to make the rails half thinner, change it to 200% to make it twice thicker).


The “Name and size” tab displays the same features as the window “New”, plus the possibility the increase or lower the rails thickness (change the rail thickness the 50% to make the rails half thinner, change it to 200% to make it twice thicker).

"Constant proportion" resizes the board length, width and thickness proportionally.

"Constant rocker prop." resizes the tail and nose rockers proportionally to the length if the "Rock./len. rat." is set to 1. Or using this ratio if different from 1.

What does it mean to load rail curve the Aku way vs s3d way?

02/04/2018
It means that, instead of letting the rail curve in the side view being interpolated by Shape3d, it edits the rail curve and gives it a shape closer to what you get in Aku.

How do I resize my board to get the volume I want?

23/06/2017

In the “Master Scale” window, the “*” button opens the Volume Wizard window that allows adjusting a dimension to get the desired volume.

Input the volume you want, and choose if you want all dimensions to be changed proportionally (Length+Width+Thickness), or only the width and thickness (Width+Thickness), or only the width, the thickness, or the length.

Then press OK!

I've been seeing a few issues with the translation from AKU (.brd or .brdx) to Shape3d. It's happening when the number of control points is not the same on all slices in Aku.

21/08/2018
In Shape3d all the slices must have the same number of control points. So, when importing such a brd file, Shape3d inserts new control point, and it tries to do it at the right places.
Sometimes the insertion of the new control points on the slices is not right. In this case you can either insert the control points yourself in Aku before the importation, or change the points order in Shape3d using the "Passive point" function (set a control point as Passive, then slide it along the curve to change it's position, then set it back as a regular point).

Here is a video tutorial that shows how to correct that kind of problem:

What is the difference between Measurements along “A Straight Line” and “The Stringer”?

23/06/2017

You can choose to edit the dimensions taken along a straight line or along the stringer line, pressing the button “A Straight Line” or “The Stringer”.

- Measurements along a straight line give width and height measurements that are taken at a defined distance straight from the tail.

- Measurements along the stringer give width and height measurements taken at a defined distance along the curve of the bottom stringer from the tail.

Note that 12” from the tail along a straight line is farther from the tail than 12” from the tail along the stringer, so it will give a larger width and smaller rocker. And 12” from the nose along a straight line is farther from the nose than 12” from the nose along the stringer.

How to remove a constant depth to the whole deck or bottom of the board for sandwich construction?

14/12/2018

A constant depth can be removed from the deck or the bottom of the board using a "Constant depth" 3D layer.

These 3D layers can be applied to the whole deck or bottom of the board if you set the external outline curve larger than the board's outline.

The layer can be extended until the Rail point (if defined) using the option "Extend rail".

The option "Smooth edges" option extends the layer to get a straight transition at the edges instead of a rectangular transition.

On the bottom, the "Extend rail" option is replaced by the "Limit rail" option, that just do the opposite.

What is "Multi-Curves Edition"?

23/06/2017

One of the most important new feature of Shape3d X is that each curve (except the Developed Outline and the True Apex) can be Edited or not in the Top and/or the Side view. If a curve is Edited , it means that the user can modify the curves moving the control points and tangents. If a curve is Not Edited , it means that the curve is computed by Shape3d.

For example, in the Side view, one can choose to edit the Bottom and Deck Stringer curves, but also the Rail line at the same time (this is the case when you open a .srf file). It gives a complete control of both stringer and rail and let the other curves be computed by Shape3d. In this case the Rail points of the slices will be locked in the vertical Z direction.

When several curves are edited, if you click between two control points a window will pop-up to let you choose the curve.

Here are all the design possibilities you have for the Top View and the Side View curves:

-        In the Top View the most common design method is the work on the Apex curve (the curve corresponding to the control point defined as the Apex on the slices).

Then you can choose to also edit the Rail curve if you want more control on the Rail curve. You can also edit several of the bottom curves on the Top View to control the shape of the channels of a board for example:


-        If the slices don’t have an Apex point defined, you can choose to work on the Outline curve. But then you won’t be allowed to edit other curves like the Rail curve for example.

-        In the Side View the most common design method is the work on the Bottom and Deck Stringer curves, which correspond to the first and last control points of the slices.

Then you can choose to also edit the Rail curve if you want more control on the Rail curve. You can also edit the Apex curve in the Side View, which can be very useful on some shapes like paddle boards:

-        Another way of designing the side view is the work on the Bottom and Deck Profiles curves, which correspond to the shadow of the board. But then you won’t be allowed to edit other curves like the Rail curve for example.

The Edited curves can be set Fixed to another edited curve . This means that the relative distance between the two curves will stay constant when the second curve is modified. For example one can set the Deck Stringer line Fixed to the Bottom Stringer line, so that the stringer thickness doesn’t change when the Bottom Stringer line is modified. This thickness can be displayed in the Thickness View.

If rail and stringer are both edited, you can choose to lock the rail line to the stringer line so that the depth of the concave or V doesn’t change when you modify the stringer line. Then you can display the depth of the concave or V in the thickness panel and stretch it vertically to have a better view of the details…

In the Thickness View, if the curve displayed corresponds to the thickness between a curve that is fixed to another one and this other curve, the control points appear and the curve can be modified. In this view the curvatures can be displayed, and the colors changed. Also the curve can be stretched vertically if it’s too flat to be seen correctly.

What does "Display curvature along the curve" means?

21/12/2018

If the option "Display curvature along the curve" is selected in the Preferences window (see menu Files), the curvature curves are displayed perpendicularly to the original curves.

In comparison, if this option is not selected, the curvatures are drawn along the X axis.

What is a "3D Layer"?

23/06/2017

The second most important new feature of Shape3d X is the possibility to add or subtract shapes to a board. These shapes are called 3D Layers. To add a 3D layer, simply click on the button New 3D Layer in the Master Scale window.

The 3D layers can be added to the deck or the bottom of the board. Its curves and curvatures can be displayed in any color. If the Active box is not checked, its shape won’t be added in the 3D view or in the CNC mode. Once created, the 3D layer appears at the end of the curves list. The name can be changed.

There are three kinds of 3D layer:

- The Center layers  are shapes which outline is designed in the Top View, and the depth is defined in the side view. It contains slices that are mapped on the board slices. The number of slices is not limited.

The Interpolation method can be set either Homogeneous (the thickness of the 3D layer increases proportionally to the width) or Horizontal (the thickness doesn’t depend on the width).

For Bottom 3D Layers, the option “Map on extended bottom” allows mapping the layer’s slices on the extended bottom if the layer is larger than the board’s outline.

The addition of new slices is done through the menu Slices -> Add new slice on selected 3D layer.

For smooth transition of the 3D layer’s slice with the board’s slice, the control point’s tangents can be aligned with the board’s slice curve with the menu Control Point -> Stick selected point to original shape.

The whole slice of the 3D layer can be stuck to  the board’s slice with the menu Slices -> Stick selected slice to original shape.


- The Twin layers  are shapes which outline is designed in the Top View (one inner curve and one outer curve). It contains slices that are mapped on the board slices. The number of slices is not limited.

If the Inner curve is not along the center axis, the 3D layer contains two symmetrical shapes. On the other hand, if the inner curve is along the center axis (Y = 0), the 3D layer contains only one shape.

The Interpolation method, the Map on extended bottom option, and the design of the slices, are the same as for Center layers.

- The Side Cut layers  are shapes that are defined by a curve that cuts the Side view.

- The Constant Depth layers  are shapes that are defined by their depth and their outline designed in the view.


- The Vertical Cut layers  are defined by their outline designed in the view, and removes the volume between the outline Int and outline Ext.

The 3D layers can be saved in a separated file, and then loaded in another board file using the menu “3D Layers” -> “Load 3D layer”. They can also be deleted from the board design.

Several 3D layers can be added one on the other.

What change do the interpolation modes of the 3D layers do?

29/01/2023

There are 3 interpolation modes: In the Homothetic Z/YZ mode, the height of the slices is rescaled homothetically with the width and with the ends Z variation. In the Angular Z mode the height of the slices doesn't depend on their width, it's adjusted with the angle of its ends. The Homothetic Z/Y Angular Z mode is a mix of the two other modes: the height of the slices is rescaled homothetically with the width, and then adjusted with the angle of its ends.


How can I get the measurements at any position?

23/06/2017

 You can add as many "Measurement bars"  as you want:

This button allows displaying the measurement bars that gives the measurements of all the displayed curves of a panel at a defined distance from tail or nose.


What does the option Map on extended rail do ?

29/01/2023

The option "Map on extended railallows mapping the layer's slices on a straight line extrapolated from the rail point. Note that since version 9.1.2.0 you can define a rail point on the bottom of the slices, but also on the deck.


Are there keyboard shortcuts?

23/06/2017

Yes, a lot:

The Left Click
The left click allows selecting a control point or a guideline.

The Ctrl + Left Click
Ctrl + left click allow selecting several points, or guidelines.

The Shift + Left Click
Shift + left click allow selecting all the points, or guidelines, between two selections.

Shift + Ctrl + left click will select a control point in priority even if a guideline is displayed at the same position.

The Double Left Click
The double left click allows adding a control point or a guideline if the guidelines are shown on screen.

The Right Click
The right click makes the context menu appear.

The Arrows keys
The arrows keys allow moving the selection.

Control points/Tangent points displacement:
Arrow + Shift make 2 times smaller displacements
Arrow + Ctrl make 4 times smaller displacements
Arrow + Shift + Ctrl make 10 times smaller displacements

Ghost displacement:
Arrow + Shift rotates the ghost instead of moving, in the profile view
Arrow + Ctrl make 4 times smaller displacements
Arrow + Shift + Ctrl make 4 times smaller rotation anglesin the profile view

CNC board displacement in blank:
Arrow + Shift rotate the board instead of moving (and move instead of rotating in rotation mode)
Arrow + Ctrl make 4 times smaller displacements
Arrow + Shift + Ctrl make 4 times smaller rotation angles

Note that the more you zoom in the smaller the steps.

The Tab key
Tab change the selection to the next point, or the next guideline.
Tab + Ctrl change the selection to the previous point, or the next guideline.

The Del key
Del will delete the selection. 

The Ctrl + C keys
Ctrl + C copy the curve (outline, bottom, deck, thickness, or slice) in the clip-board. Then, you can past this curve on another board, or on another slice if the curve is a slice.

The Ctrl + V keys
Ctrl + V Past the copied curve on the selected curve.

The Ctrl + A keys
Ctrl + A selects all the points or all the guidelines.

The Ctrl + Z keys
Ctrl + Z call the Undo.

The Shift + Ctrl + Z keys
Shift + Ctrl + Z call the Redo.

The Ctrl + N keys
Ctrl + N open the New board window.

The Ctrl + O keys
Ctrl + O open the board files browser.

The Ctrl + S keys
Ctrl + S save the modifications.

The Ctrl + R keys
Ctrl + R save the modifications and load the actual shape as the reference shape.

The Ctrl + B keys
Ctrl + B switch from one board to another if several boards are open at the same time.

The key
H hides all the points to let a clean curve.


The key
T shows the tangents of all the control points of all the displayed curves.

The key
E shows the design errors (superposed control points in green, kinks and loops in red) of all the displayed curves.

What means "mapping on y and z" in the Free 3D layer properties?

20/09/2023
The term Mapping may be poorly chosen. Originally the 3D layers were always placed on the original shape: the ends of the slices of the layers are glued to the slices of the board. So we used the term mapping. But with the Free layers we can now choose how we fix the ends of the slices of the layers in Y and Z: either stuck to the original slice, or fixed to a curve, or Free. Y mapping = Otl Int curve or Otl Ext curve -> We use a curve to set the size of the slices Z mapping = Side Int curve or Side Ext curve -> We use a curve to set the height of the edges of the slices.

How do I put my vee measurements in degrees of angle?

30/04/2024
You can choose to display the angle of the tangents in the control point window:


Then you can input the angle you want:


How can I correct the bad rail interpolation when I import a .brd file from Aku?

21/05/2024
Here is an exemple of brd file that has a bad rail tuck interpolation between slices 4 and 5 around 30" from tail.
The slice 5 has the rail point with a very short tangent:

while the slice 4 has a longer tangent on the rail:

This result to a bad interpolation in the middle around 30" from tail:

You can correct that by setting a longer tangent on the rail point of slice 5 while keeping the exact same shape:


How do I measure the surface area in Shape3d?

03/06/2024
You can find the surfaces at several places in Shape3d:
- First, if you define the Category and type of the model as a foil or a fin you'll have the projected surface in the Master scale window:


- Then, in the Plan mode, the general plan you have the projected surface:


- You also have the projected and developed surfaces in the Surface distribution plan:


- Also in the Design mode if you activate the ID Numbers in the Display menu you'll get the surfaces in the design panel.

How to calculate the weight of a board?

17/09/2024
First you can define the  core density in the Size & parameters window, tab Descripton:


Then you can get the weight of the fiberglass lamination by creating a Constant depth 3D layer that you apply on the whole board (i.e from x=0 to x=length, y mapping from deck center to bottom center), with a thickness of about 1mm, and the volume density of your lamination (~2000 kg/m3 for fiberglass): 
  
 
Note that you can also let the layer thickness to 0 and define a surface density (~2 Kg/m2 for 1mm fiberglass lamination).

Then you can create a Vertical cut 3D layer that is a straight line at the center to render for the wood stringer. The density of the wood being around 300 kg/m3:


If you positioned the fin and leash plugs, verify that the weight is correctly defined. Standard plug systems have their weight set by default, but you can adjust it if needed:


Once all this is done, you can get the total weight and the detail of the weight of each element in the Plan mode / Volume and Surface distribution:
  
 
You can download an exemple of file with fiberglass and stringer 3D layers defined at Warehouse

How to use the Buoyancy line?

11/10/2024

How do I use the Buoyancy line function to know how the board will float when I’m on it?

Let’s say you’re 70kg (with gears), and the board weight 6kg. Then the total needs 76L to float on the water (on fresh water, for very salty water it can go down to 74L).


So if your board is more than 76L, you’re good. You can set the buoyancy volume (BV) to 76L, and Shape3d will compute the buoyancy height (BH), and the waterline, wet surface…

To summarize:
Buoyancy Volume (BV in Liters) = Total weight (in Kg)


Now if the board is less than 76L, is it possible to know how much I’ll sink on it? Yes, approximatively. If the board is 50L, then it’ll need 26L more to float. The volume of a men of 70kg is approximatively 70L (add a couple of liters if he wears a wetsuite). So 26L on his 70L will be immersed when he’s on the board. That 36% of his body, it should be between the knees and the waist.

To summarize:
% of rider body immersed =  100*(Total weight (in Kg) – Board Volume (in L)) / (rider weight (in Kg))


What is the difference between Stringer and Profile?

16/10/2024

The Stringer is the center curve, bottom or deck. The Profile is the shadow, so the Bottom Profile curve is the curve of the lowest points of the slices, and the Deck Profile is the curve of the highest points of the slices:

How to measure the 'cant' of a fin (for future fins)?

24/10/2024
The Fin cant refers to the angle at which the fin is positioned on the board.You can use the function "Show Selected Arc Dist./Depth" in the Display menu (or D key), it shows the length, depth and angle of the selected curve arc:

The 3D Mode

What do the colors means in the "Curvatures Mode"?

23/06/2017

In the "Curvature Mode" the highly convex areas will be displayed in green and yellow, and the highly concave areas will be displayed in pink and red. The blue areas are almost flat. The relative curvature radius R can be adjusted to show the curvature (C = 1R) changes more effectively.

Radial

Longitudinal

On my PC, when opening the 3D view the program closes or I don't get anything.

29/04/2024
You need to check that the DirectX 11 plugging is installed on your PC:

Also you need to check that your graphic card can handle it. Some computers have 2 graphic cards, then you need to make sure it uses the best one by default.

The Plan Mode

What are the values shown in the "Marks" sheet?

23/06/2017

The menu “Marks” gives access to the lists of measurements of the outline, profile and slices.

The coordinate axis is classically defined with the X-axis as the longitudinal axis, the Y-axis as the transversal axis, and the Z-axis as the vertical axis.

Outline and stringer: Provide the marks needed for creating the design. The meaning of the column is as follow:

X-Coordinate: Position on the longitudinal axis.

X-Developed>: Position of marks on the board, taking into account its curve (Essential to draw the marks on the foam loaf after cutting).

Hull-Z: Height of the bottom compared to 0.

+sdw: Z height minus the thickness of the sandwich (defined in Board/Properties).

Deck: Z height of the deck compared to the point z = 0.

-sdw>: Height of the deck minus the sandwich thickness.

Outline: Width Y at X.

-sdw: Width minus the sandwich thickness.

Carre: Width Y of the edge point.

>-sdw>: Edge width (taking into account the sandwich, see Plan/Slices full size to visualize this position).

Slices: The marks of a given slice.

Shape lines: Marks of the shape lines. See screen Plan/Shape plans 1 and 2 to understand the meaning of the columns.

Origin of the coordinate system (related to the foam loaf after hot wire cutting):
S1Y, A1Y, A1y, and A2y: represent the middle of the loaf.
S1Z, S2Z, A1z, and A2z: represent the lower edge.
S2Y: represent the exterior edge.

The point is to draw the S1 and S2 shape plans lines first, and cut the plans.

Then you can draw the A1 and A2 plans lines, and cut the secondary plans to get closer to the final shape.

What is the difference between Surface, Surface dev deck and surface dev bot?

26/06/2017
The "Surface" is the projected surface from the top: that's the surface of the outline you see in the General plan.
The "Surface dev deck" is the developed surface of the deck skin. If the Rail point is defined, it is calculated from the center of the deck to the rail point. If not, it is calculated from the center of the deck to the apex (widest) point.
The "Surface dev bot" is the developed surface of the bottom skin. If the Rail point is defined, it is calculated from the center of the bottom to the rail point. If not, it is calculated from the center of the bottom to the apex (widest) point.

What are the Metacenter height and the Righting arm in the Hydrostatic Stability curves?

14/12/2018

The Righting arm corresponds to the lateral displacement of the buoyancy center that happens when a heel angle is applyed to the board.

The Metacenter is the intersection between the axis of the board and the line that goes vertically above the  buoyancy center. The Metacenter is computed with a very small heel angle.

What is he signification of the Metacenter height value? The higher the Metacenter the more stable is the board.

Basically, if the gravity center of the rider is higher than the Metacenter and he's a beginner, he will fall. 

How do I print the outline so I can make a full scale template?

20/08/2020
That's in the Plan mode, Full Scale -> Developed Outline (to cut the outline in a blank that already has the profile shape) or Projected Outline (to cut the outline in a rectangular block blank). On a regular printer it will be printed on several pages that you'll need to stick together. If the scale is not exactly right, you can set a correction factor in the menu Files -> Preferences.

The CNC Mode

What's the difference between stringer roughing and ghost stringer paths?

22/06/2017
The Stringer roughing is doing almost the same as the ghost paths, except that you define the max thickness of wood the cutter can cut in one path, and it will calculate the number of ghost paths needed. In addition, if the blank is thick at on place and needs 5 paths, but thin at another and needs only 2 paths, the stringer roughing will do 2 paths on the whole stringer, and then 3 paths only on the area that is thick, to gain time.

How do I cut a board in two pieces because it's longer than my machine?

22/06/2017
You can use the Margins in the Tool Path 2 tab.
For example if the board is 14' long and your machine only 10' long, you can first cut the tail setting the nose margins for deck and bottom to 4'. Then you'll cut the nose setting the tail margins for deck and bottom to 10'.

The other possibility is the create two board files, cutting the board in two pieces using the function "Extend/Reduce board" in the menu Components of the Design mode: If the board is 10', start reducing the Tail by -5', and save it as BoardTail.s3dx. Then reopen the original file, and "Extend/Reduce board" the Nose by -5' and save it as BoardNose.s3dx

With my disk CNC machine (APS3000, AKU) the edge of the bottom rails are edgy like. How to get a better bottom rail cut?

28/05/2021
OK, let me give you a tour of the influence of each parameter:
 - The Max angle Deck is a first limitation. You can go from 136° to 146° for exemple and you'll get the bottom rail cut a little lower:
 

But if you go to 180° you'll see no change:
 

- Another limit here is the min Z that stops the bottom rail cuts if the bottom of the disk goes bellow a given Z value. Above it's set to 0. If I set it to -100mm the cut goes a little lower but not much. And you must check if the disk can indeed go bellow z=0 without cutting the frame.
 

- Then comes the disk motor width and thickness. If you lower the motor width from 120mm to 100mm you see no change:
 

And you can actually see that the motor doesn't touch the rail at the middle during the lowest cut. On the other hand, if you lower the motor thickness at the rear from 120mm to 100mm and at the front from 50mm to 40mm you'll see that it goes a little lower:
 

And if you set e1 and e2 to 0 you see that it goes even lower and that the motor is right on the rail during the lowest cut:
 

The point was just to show you the influence of each parameters. Now the best is to measure the motor precisely and use the real values. So there are limitations you can't avoid.

- Now if you want to cut the bottom rail less edgy, you can cut more of the bottom rail during the bottom cut. The Deck/bot limit you chose is "Tuck + Flat bottom". This means that it cuts as much as it can during the deck cut, and then only cut the flat section of the bottom (the rail point needs to be defined in the design mode):
 

The advantage of this mode is that you don't get the rail eaten if the alignment is not good after you flip the board to cut the bottom. But it gives edgy bottom rail, specially on longboards. If you use the mode "Tuck" instead, it'll cut as much as it can during the deck cut, and then cut the rest of the bottom rail during the bottom cut:
 

This gives a well finished result, provided the alignment is correct during the bottom cut. The number of paths on the bottom rail can be adjusted in the settings tab:
 

May I use my V8 machine file with Shape3d X ?

22/06/2017
You should use two different machine file for V8 and VX, because VX has some parameters that are not in V8. So once saved with VX the machine file won't work with V8.
On the other hand, if you want to keep the same set of parameters with VX and V8, you can duplicate your V8 machine file, and use the copy with Shape3d X.

What is the "Machine file" and how do the CNC parameters are saved?

23/06/2017

The machine file is the file that contains the default settings used in the CNC mode of Shape3d.

If you open a new board file that hasn’t been used in the CNC mode, the CNC parameters will be loaded from the machine file, and the complete location of the machine file will appear in the title of the CNC properties window.

If the board file already contains some CNC parameters, the parameters will be loaded from the board file, and the CNC properties window will have the title “Parameters from board file”.

The machine file can be changed in the CNC properties window clicking on the button “Change machine file”. It can also be changed directly in the Preferences window.

The Preferences dialog box can be opened through the menu "File", "Preferences...":

This is where you can directly change the location of the Machine File. It is very important to keep this file in a safe folder (not in the default exe folder or it will be replaced next time you update Shape3d), and to do a backup, since it contains all the default settings corresponding to your machine. If ever these settings are modified by mistake, you can get you settings back reloading the backup machine file.

What is the "Format file", and how can I customize the G-Code?

23/06/2017

The "Format file" contains the header and the footer that will be inserted in the G-Code cutting files. It must contain instructions need by the post-processor and supported by your machine. 

Here is an example of G-Code format file:

[ $MODEL_NAME$ $SIDE$ $DATE$ ]
[ $MCU_CUTTER_TYPE$ ]
[ $DIMENSIONS$ ]
[ $H1_H2$ ]
[ $TAIL$ $NOSE$ ]
[ $DECK_TAIL_30.0$ ]
[ $DECK_NOSE_30.0$ ]
[ $BOT_TAIL_30.50$ ]
[ $BOT_NOSE_30.5$ ]
[ $STRUT_TAIL_30.50$ ]
[ $ STRUT _NOSE_30.5$ ]
[ $MACHINE_FILE$ ]
[ $BLANK_FILE$ ]
G28                              [G28  HOMES MACHINE]
G91                              [G91  RELATIVE MODE]
G92 X0 Y2. Z2.5                  [G92  RESETS POSITION CORD.]
G1 XYZ F555                      [SYC. MACHINE / F=FEEDRATE]
M61                              [M61  START DUST MOTOR]
M3                               [M3   START SPINDLE MOTOR]
S12500                               [S3   13,500 RPM SPINDLE]
G90                              [G90   ABSOLUTE MODE]

Z2.0000 F222   [RAISE CUT. OFF BOARD]
M5
M64
X-13.0000 F222

The tags between $$ will be replaced by the corresponding values:

[ New model Deck 04/26/15 15:58:31 ]
[ MCUTOOL T1 D40.00 R10.00 F50.00 L40.00 C1 ]
[  1867.70 x 460.00 x 60.58 ]
[ H1 : 100.10, 0.00 H2 : -100.10, 0.00 ]
[ TAIL : -1876.35, 19.58 NOSE : -26.52, 41.34 ]
[ DECK TAIL 30.00 : 29.51 ]
[ DECK NOSE 30.00 : 39.53 ]
[ BOT TAIL 30.50 : 14.30 ]
[ BOT NOSE 30.50 : 26.60 ]
[ STRUT TAIL 30.50 : 14.30 ]
[ STRUT NOSE 30.50 : 26.60 ]
[ Machine_BullNose_Supports.s3d.xml ]
[ 6.2-R.s3d ]
G28                              [G28  HOMES MACHINE]
G91                              [G91  RELATIVE MODE]
G92 X0 Y2. Z2.5                  [G92  RESETS POSITION CORD.]
G1 XYZ F555                      [SYC. MACHINE / F=FEEDRATE]
M61                              [M61  START DUST MOTOR]
M3                               [M3   START SPINDLE MOTOR]
S12500                               [S3   13,500 RPM SPINDLE]
G90                              [G90   ABSOLUTE MODE]

G1 X-24.3236 Y0.0000 Z82.5673 F200
X-24.3236 Y0.0000 Z60.2295 F10
X-24.3336 Y0.0000 Z60.2301
X-26.3336 Y0.0000 Z60.2701

X-29.4442 Y0.0000 Z97.0201 F222

Z2.0000 F222   [RAISE CUT. OFF BOARD]
M5
M64
X-13.0000 F222

You can use the tags $DECK_TAIL_0.0$ $DECK_NOSE_0.0$ $BOT_TAIL_0.0$ $BOT_NOSE_0.0$ with any distance from tail or nose to get the height of the deck or bottom stringer (along a straight line, in the unit used in the CNC mode of Shape3d). $STRUT_TAIL_0.0$ $STRUT_NOSE_0.0$ will give you the blank bottom height during deck cut, and the board deck height during bottom cut.

How do the rotation angles are defined for 4 and 5 axis machines?

23/06/2017

- For 4-5 axis machines, in addition to the cutter dimensions, you can specify the number of axis: 4 or 5.

- The Max cutter angle/Oz is the maximum angle of the tool axis with the vertical axis in ° that the machine can handle.

- The Switch cut angle/Oz is the angle of transition between the cut with the tip of the tool and the cut with the vertical part of the tool. Set this angle between 45° and 90° to cut the bottom rail of the board with the vertical part of the cutter.

- The Max var angle is maximum variation of the tool angle along one path from tail to nose. If this angle is set to 0, the tool will keep a constant tilt from tail to nose, the tilt changing between each line.

- The Arm length is the length of the arm between the center of rotation to the tip of the tool.

- The Ref. A angle is the angle A written in the exported cutting files when the tool is vertical. The sign of the angle can be inverted.

- The Ref. B angle (for 5 axis only) is the angle B written in the exported cutting files when the arm is in the Oyz plan (the slices plan). The sign of the angle can be inverted.

Is it possible to modify the "Change tool" commands for the tool changer of my machine?

23/06/2017

With the multi bull nose option, you can defined the dimensions of up to 6 cutters: one for the Stringer path, one for the Outline path, one for the 3D Layers, one for the Plugs, one for the rest of the Bottom cut, and one for the rest of the Deck cut.

If a cutter is not checked, the first bull nose (Lines) will be used instead.

The default command for tool changing are:

Start Lines cutter: < Changement cutter lignes >

End Lines cutter: < U5 >

Start Stringer cutter: < Changement cutter stringer >

End Stringer cutter: < U4 >

Start Outline cutter: < Changement cutter outline >

End Outline cutter: < U3 >

Start Bottom Lines cutter: < Changement cutter lignes bottom >

End Bottom Lines cutter: < U6 >

Start 3D layers cutter: < Changement cutter 3D layers >

End 3D layers cutter: < U7 >

Start Plugs cutter: < Changement cutter plug >

End Plugs cutter:: < U8 >


These commands can be changed adding the following tabs in the post processor format file:

Start Lines cutter:  < START_TOOL_1 > ... < /START_TOOL_1 >

End Lines cutter:  < END_TOOL_1 > ... < /END_TOOL_1 >

Start Stringer cutter:  < START_TOOL_2 > ... < /START_TOOL_2 >

End Stringer cutter:  < END_TOOL_2 > ... < /END_TOOL_2 >

Start Outline cutter:  < START_TOOL_3 > ... < /START_TOOL_3 >

End Outline cutter:  < END_TOOL_3 > ... < /END_TOOL_3 >

Start Bottom Lines cutter:  < START_TOOL_4 > ... < /START_TOOL_4 >

End Bottom Lines cutter:  < END_TOOL_4 > ... < /END_TOOL_4 >

Start 3D layers cutter:  < START_TOOL_5 > ... < /START_TOOL_5 >

End 3D layers cutter:  < END_TOOL_5 > ... < /END_TOOL_5 >

Start Plugs cutter:  < START_TOOL_6 > ... < /START_TOOL_6 >

End Plugs cutter:  < END_TOOL_6 > ... < /END_TOOL_6 >

How can I change the speed of the machine?

23/06/2017

 Cutting Speed

You can change the speed of the cutter at special points of the cutting path (the "cutting points"). Click on this button to display the Cutting Speed window and change the different speeds, or the speed unit.

- The Acceleration distance allows for smooth speed increases over this fixed distance. The Deceleration distance allows for smooth speed reductions over this fixed distance.

- You can set a Maximum curvature radius that will define the "kinks" of the toolpath. Then, you can set a special speed for the kink zones. This is especially useful for the wings...

- The relative length of the Begin and End areas of the paths can be defined separately for lines, outline, and stringer.

- Click on a line of the Cutting Speed window, to enlighten the corresponding sections of the cutting path. These sections appear in blue when the speed is minimum and red when the speed is maximum.

Double click on the cutting speed window lines to change the speeds.

If the speed is set to 0, it means that there won't be any speed change while entering in this speed area.

Each speed section can be de-activated for simplicity, so the Default speed will be applied and less speed will need to be defined.

You can also place the mouse pointer on the cutting path points to display the current speed and right-click on it to enlighten all the cutting path sections that have the same speed. You can also move the cutter along the cutting lines with the up and down arrow keys and press Enter to show the Cutting Point dialog box and change the value of the speed.

I'm getting asymmetric cuts. Could it be due to Shape3d?

29/06/2017
The exported toolpath is perfectly symmetric. So if you get an asymmetric result it's either that the center axis is slightly off, or that the pressure difference between when the cutter "rolls" or "eats" shifts the machine arm. It could also be due to inertia if you cet fast, but then you'll get distortions in addition to asymmetry.

How can i share my design files with a CNC operator keeping my file info safe?

03/07/2017
You can use the protection "Cutting path only", see tutorial at https://www.shape3d.com/Support/User_Manual_V9.htm#_Toc368060270
 
That won't prevent the factory from cutting your file as many times as they want though, because once they have created a cutting file it can be used for ever. So sending them a cutting file instead of a protected s3dx file is not any safer.

What are the tags that can be used the customize the Format file?

23/04/2018
Here is the list of all the usable tags:
❬BOT_HEADER❭❬/BOT_HEADER❭ special bottom header area
❬DECK_HEADER❭❬/DECK_HEADER❭ special deck header area
❬BOT_FOOTER❭❬/BOT_FOOTER❭ special bottom footer area
❬DECK_FOOTER❭❬/DECK_FOOTER❭ special deck footer area
$MODEL_NAME$ surf_.Nom()
$SIDE$ "Deck" or "Bot"
$DATE$ CTime::GetCurrentTime()
$MCU_CUTTER_TYPE$ "MCUTOOL T1 D%.2f R%.2f F%.2f L%.2f C1"
$DIMENSIONS$ dims
$VOLUME$ vol
$H1_H2$ "H1 : %.2f, %.2f H2 : %.2f, %.2f"
$MACHINE_FILE$ machine file name
$BLANK_FILE$ blank file name
$DIST_BOARD_BLANK_TAIL$ Distance Board-Blank tail
$DIST_BOARD_BLANK_NOSE$ Distance Board-Blank nose
// Distances from BOARD tail or nose
$X_CENTER$ gives the x position of the board center from zero
$X_FROM_TAIL_x.x$ gives the x position form zero of a point at the distance x.x from board tail
$X_FROM_NOSE_x.x$ gives the x position form zero of a point at the distance x.x from board nose
// Deck board stringer Z
$TAIL$ "TAIL : %.2f, %.2f" Board tail X Z position
$NOSE$ "NOSE : %.2f, %.2f" Board nose X Z position
$DECK_CENTER$ Z position of the stringer deck curve center
$BOT_CENTER$ Z position of the stringer bottom curve center
$DECK_TAIL_x.x$ gives the Z position of the stringer deck curve of a point at the distance x.x from board tail
$DECK_NOSE_x.x$ gives the Z position of the stringer deck curve of a point at the distance x.x from board nose
$DECK_ZERO_x.x$ gives the Z position of the stringer deck curve of a point at the distance x.x from the zero of the machine
$BOT_TAIL_x.x$ gives the Z position of the stringer bottom curve of a point at the distance x.x from board tail
$BOT_NOSE_x.x$ gives the Z position of the stringer bottom curve of a point at the distance x.x from board nose
$BOT_ZERO_x.x$ gives the Z position of the stringer bottom curve of a point at the distance x.x from the zero of the machine
$STRINGER_DECK_POLY$ Polygone board stringer deck
$STRINGER_BOT_POLY$ Polygone board stringer bot
// BLANK
$X_BLANK_CENTER$ gives the x position of the blank center from zero
$X_FROM_BLANK_TAIL_x.x$ gives the x position form zero of a point at the distance x.x from blank tail
$X_FROM_BLANK_NOSE_x.x$ gives the x position form zero of a point at the distance x.x from blank nose
// Blank Stringer
$BLANK_TAIL$" "BLANK TAIL : %.2f, %.2f", p.x, p.z);
$BLANK_NOSE$" "BLANK NOSE : %.2f, %.2f", p.x, p.z);
$BLANK_DECK_CENTER$ Z position of the blank deck curve center
$BLANK_BOT_CENTER$ Z position of the blank bottom curve center
$BLANK_DECK_TAIL_x.x$ gives the Z position of the blank deck curve of a point at the distance x.x from blank tail
$BLANK_DECK_NOSE_x.x$ gives the Z position of the blank deck curve of a point at the distance x.x from blank nose
$BLANK_BOT_TAIL_x.x$ gives the Z position of the blank bottom curve of a point at the distance x.x from blank tail
$BLANK_BOT_NOSE_x.x$ gives the Z position of the blank bottom curve of a point at the distance x.x from blank nose
$BLANK_STRINGER_DECK_POLY$ Polygone blank stringer deck
$BLANK_STRINGER_BOT_POLY$ Polygone blank stringer bot
// Bottom either surf or blank if atfter or before flip
$STRUTS_POLY$ Polygone bottom from zero either surf or blank if atfter or before flip
$STRUT_CENTER$ gives the strut Z position at the center of the board
$STRUT_TAIL_x.x$ gives the strut Z position at the distance x.x from board tail
$STRUT_NOSE_x.x$ gives the strut Z position at the distance x.x from board nose
$STRUT_ZERO_x.x$ gives the strut Z position at the distance x.x from the zero of the machine
$STRUTS_GROUND_POLY$ Polygone bottom from ground either surf or blank if atfter or before flip
$STRUT_GROUND_CENTER$ gives the strut height from the ground at the center of the board
$STRUT_GROUND_TAIL_x.x$ gives the strut height from the ground at the distance x.x from board tail
$STRUT_GROUND_NOSE_x.x$ gives the strut height from the ground at the distance x.x from board nose
$STRUT_GROUND_ZERO_x.x$ gives the strut height from the ground at the distance x.x from the zero of the machine

I cut an asymmetric for a customer. It cut the tail on the wrong side. The file was right but the CNC machine cut the opposite side.
Any idea why?

04/06/2021
In the CNC mode, the direction of the X Y Z axis can be different for each machine, as there are many possible different machine configurations.
In the Axis tab of the CNC parameters you can set the axis along the width of the board in the + or - direction, and this will revert the cut for an symmetric board.
So if your machine cut the tail of an asymmetric board the wrong side it means that the width axis direction is wrong in the Axis tab of the CNC parameters.
If you don't want to change the width axis direction because you're afraid it could mess with your other settings, you can revert the left and right of an asymmetric board in the Design mode: menu Action -> Reverse left/right.

When I open a s3dx file, the program does not ask me if I want to load the CNC settings from the board file and always opens the CNC mode with my default settings, even though I checked the option "Load board files with CNC parameters" in the Preferences.

18/06/2021
Shape3d loads the CNC parameters from the board file only if the machine type and cutter type are the same as your default CNC parameters. 
And note that some board files just don't have CNC parameters, if the shapers didn't check the option "Save CNC parameters in board files".
You can still load the CNC parameters of the board file from the menu CNC machine -> Load CNC parameters from board file.

When I load a file in the CNC mode I get the message "The rail point is not defined. It won't be detected during the computation."

22/06/2017
It means that the rail point is not defined on the slices. 
Go to the design mode and define the rail point on one slice: click on the rail control point, then press the "Rail" button in the control point properties window.

When designing the slices, it is recommended to set the point type of the rail point as , and the apex point as . They will then appear in blue and green respectively.

How should I set the CNC parameters in Shape3d to run my Aku machine just like with Aku shaper?

22/06/2017
Here is the correspondance between the CNC parameters in Shape3d and Aku shaper:
Aku
Shape3d (Tab Blank position)

- Tail Stop X = 1300
Machine Origine X = -1300 mm

- First Strut X = 1800 Z = 280
H1 X = 1800 Z = 280 mm From Origine

- Second Strut X = 2800 Z = 280
H2 X = 2800 Z = 280 mm

- Cutter Z = 666
Machine Origine Z (/Grd) = 666 mm

(Cutter Tab)
- Disc Diameter = 280
Diameter D = 280 mm

Thickness e = 8 mm

- Actuators First = 1605
X blank referencing X1 = 305 mm (= 1605 + Machine Origine X = 1605 - 1300)

Second = 2225
X2 = 925 mm (2225 - 1300)

Third = 3145
X3 = 1845 mm (3145 - 1300)


Always check that the unit checked in the CNC mode is MM. The speed unit must be MM / MN.

How should I set the CNC parameters in Shape3d to run my Precision Shaper machine just like with Precision shaper?

12/05/2023
Here is the correspondance between the CNC parameters in Shape3d and Precision Shaper:
PrecisiontoShape3dCNC.png

The Export Option

How can I change position of the slices when exporting a "Hollow Wood Plan"?

23/06/2017

If you set the "Number of slices" equal to the number of definition slices (including the tail and nose tips slices), the exported cross sections will be exactly at the same x positions as the definition slices.

How can I set the position of each slice rib at the position I want when I export a Hollow Wooden Plan?

24/07/2017
If you set the number of exported slices exactly the same the number of definition slices of the board, the exported slices will be at the same position as the definition slices. That includes the tail and nose slices.

The Scan Option

How can I import scan data in Shape3d?

23/06/2017

- Choose the importation format "BOARD" and browse to open the file you want to import (DXF, G-Code, or text format). Click on the button "load".

- The scan points appear on the controller. The grey points are the file data, and the blue points are the one that will be imported into Shape3d.
Check that everything is alright (tail at x=0, deck upward ...).


* If everything looks alright:


Check the "automatic fitting" box and click on OK.
It will take a few seconds to adjust the curves on the scan points.


* If the scan data doesn't look good:

If the scan data doesn't look good on the controller after importation, click on “Advanced”:

- Check the box "One side" if the file contains only half of the board.

- If the digital probe is a ball, you can input the probe radius, which will be subtracted to the dimensions.

- If you want to import your data into a board that is in the "Stringer" design mode, check Profile detection: "Stringer". The software will then look for the stringer data around the X axis (with the tolerance fixed in the box Slices: "Tolerance"). On the other hand, if you want to import your data in a board that is in the design mode "Profile", check Profile, and the software will look for the lowest and highest points of each slice to create the profile.

- If you want to import your data into a board that is in the "Deck" design mode, check Top import: "Deck". If you want to import your data in a board that is in the design mode "Thickness", check Thickness, and the software will recreate the thickness from your data (in this case your data must be clean).

- You can also reduce the number of slices if too many of them have been scanned.

- You can tune the tolerance. It allows the importation of slices even if they are not right in the Oyz plan.

- You can switch the axis: the X must be the length direction (towards the nose), the Y must be the width direction, and the Z must be the vertical direction (towards the deck).

- You can change the direction of each axis.

- You can reduce the scan data to a window in each direction using the function “Filter”.

- You can apply an offset to the data in each direction using the function “Offset”.

- If the board is not well aligned with the axis, you can apply two rotations around the axis of your choice.

Then press “Apply”. Note that if you press the button “Load” again, your axis settings will be conserved, but the data will be repositioned so that the tail is at x = 0.

Launch the automatic fitting when it looks good.


* If the automatic fitting fails:

You can do the importation of the data without adjusting the curves automatically. Then the dimensions of the model will be adjusted with the data dimensions, but the curves of the model won’t be fitted on the guidelines. It can be a good way to see what’s wrong with them, and move, or remove, the bad ones.

Then, you can choose to adjust each curve automatically or by hand.


* When the automatic fitting is finished:

Check all the curves of the model:
- Check profile and outline. The automatic adjustment may not be perfect. You can do the automatic adjustment again choosing the number of control points you want (right click, automatic fitting, fit the whole curve, choose the number of arcs). You can do it by hand as well. Check in particular the points and tangents at each end, and then, the smoothness of the curves.
- Check the slices; the automatic fitting tries to place a control point right at the rail, but if the rail is not sharp enough, or if
the scan data is not very clean, the control point can very well be at a wrong position. If so, you can clean the guidelines and do an automatic fitting again. But the safest way is to place the control point right at the rail by hand and adjust the slice, arc by arc. Do it for each slice.
DO NOT HESITATE TO DELETE THE SLICES THAT DO NOT LOOK NECESSARY; the less slices the smoother (same with the control points).